If you want to learn how to make press on nails to sell in the simplest form, this article is your guide. Press-on nails are a popular and convenient way to achieve salon-quality nails at home. They are also a great business opportunity for creative entrepreneurs with a knack for nail art.
With the increasing demand for unique and trendy nail designs, entrepreneurs can showcase their artistic skills by creating custom press-on nails. By offering various designs and styles, they can cater to various customer preferences and stand out in the market.
The affordability of press on nails makes them an attractive option for customers looking for a budget-friendly alternative to regular salon visits. Overall, the popularity of press on nails and the potential for creativity make it an exciting business venture for aspiring entrepreneurs in the beauty industry. If you aren’t quite sure how to make press on nails to sell Youtube, TikTok, Instagram and Pinterest will be a huge benefit to your success.
Simply go online on sites such as Google, or Bing and type in “How to make press on nails to sell.” It will generate a list of resources for you to use that will assist you in creating your press on nails. The list below was created to get you started.
Videos Links On “How To Make Press On Nails To Sell”
Press on nails for beginners | How to make press on nails IN DEPTH | Press on nails business |
step-by-step guide on how to make press on nails to sell:
1. Gather Your Supplies.
You will need the following supplies:
| Material List |
|---|
| Full- Cover Nail Tips |
| Nail Stands |
| Adhesive Nail Putty |
| Alcohol Wipes |
| Nail File |
| Nail Buffer |
| Base Coat |
| Nail Polish |
| Gel Nail polish (Optional) |
| Nail Art Supplies |
| Top Coat |
| UV/Lamp or Nail Dryer |
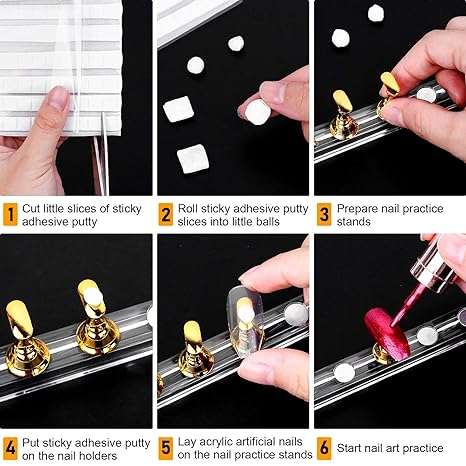
2. Prepare your nail stands.
Before you begin making your personal nails to sell, you will need to set up your nail stands. To do this you will need your nail stands as well as an adhesive putty. The nail putty will be used to hold the press on nails on the stand. Roll your nail adhesive into small round balls and stick them to the top of your nail stands. When doing this be sure not to use too much adhesive putty because sometimes it tends to stick to the inside of the nail tip.
When this happens, it can sometimes interfere with your design set as well as make it harder for you to remove the adhesive from the inside of the nail tip. This is never a good thing when you are making press on nails to sell. If the adhesive does stick, you will need to file the inside of the nail tip to remove the putty. While this may be an easy fix, it can be a bad selling point since it can and it makes your nails look less professional and already worn.
3. Prepare Your Nail Tips.
After you place the adhesive on the nail stands, place the nail tips you will be using over the top of the nail adhesive and stick them to the stand. Press down hard on the nail tip to ensure that you have a firm grip between the nail and the stand. After you press your nails onto the stand, rotate them and make sure that they are flat and all facing the same way.
Also, make sure that your nails are evenly flush as if it was a complete set. By doing so you will ensure that your nail designs (if you are doing designs) will be equal to one another and in a cohesive and aesthetically pleasing fashion.
3. Apply the base coat.
Apply a thin coat of base coat to each nail tip. Be sure to apply the base coat evenly across each nail tip. You do not have to use an excessive amount of base coat on your personal nails. After your application, cure the base coat under a UV lamp for 30-60 seconds.
If you are using a base coat that you need to wipe off, be sure to wipe the nails as soon as you remove them from under the UV lamp. If you are using a no-wipe base coat this step is not recommended. You can use an alcohol pad to wipe the base coat if you wish due to habit but this step is not necessary.
4. Apply the gel polish.
Apply a thin coat of gel nail polish to each nail tip. Cure the gel polish under a UV lamp for 30–60 seconds. Repeat this step until you have achieved the desired color and opacity. If you will be using multiple colors, you should do each color separately and cure.
If you plan on creating designs on your nail tips, those nails should be painted last. Be sure to cure your nail polish immediately after polishing. You would want to do this because you want to avoid your nail polish from bubbling, puckering, peeling, or collecting dust.
5. Apply the nail art (optional).
If desired, you can apply nail art to your press-on nails. You can use decals, glitter, rhinestones, or any other nail art supplies. Cure the nail art under a UV lamp for 30–60 seconds after application. When you are applying your nail art whether it is a hand design, nail stickers, glitter, rhinestones, nail decals, or charms, be very careful.
Take your time when doing this because you want to make sure your nails are as cohesive as possible. When you are creating your nails to sell, you want to make your nail sets look as professional as possible with little to no visual defects.
6. Apply the top coat.
Apply a thin layer of top coat to each nail tip. When you are applying your top coat, be sure to apply it to every single completed nail tip! If you have to use a separate nail stand so that you can keep track of which nails have been painted, do that. It is very important that you apply a top coat to each nail, especially if you are using gel nail polish.
Be sure to cure each nail as you go, depending on how long it takes you to apply your top coat. Cure the top coat under a UV lamp for 30–90 seconds. Rotate your nail stands under your UV lamp and make sure that you cure the top, as well as the left and right sides of the nail tip.
Lightly spray your gel nail polish with a nail dryer spray halfway through the curing process. Always check that your nails are completely dry before you place them on any packaging items.
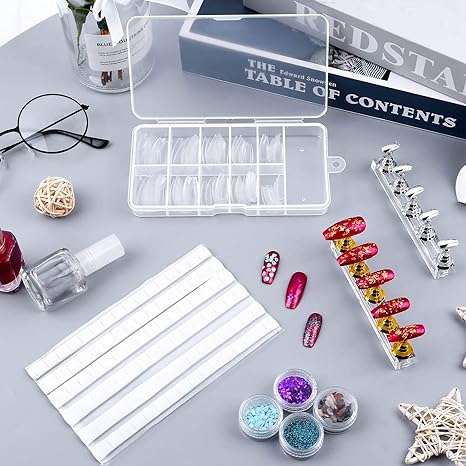
Flasoo nail tip stand holder sets come with 2 sets of silver & gold acrylic nail display holders, 96 pieces of white reusable adhesive putty and 100 pieces of false nail tips in a plastic box, an adequate quantity for satisfying your practice manicure and nail art needs.
7. Remove the nail tips from the nail stands.
Once the top coat has cured, you can remove the nail tips from the nail stands. Before you remove your nails from the nail stands, make sure that they are completely dry once again. Take each nail off the nail stand one at a time and remove the adhesive nail putty from the inside of the nail tip.
If you are preparing multiple sets at one time, make sure you keep your nails in the exact order that they will be placed in your nail packaging. For example, you want to have some index finger, middle finger, ring finger, and pinky finger in a straight line.
This all depends on how you plan on packaging your nail sets. Some people like to place double fingers together; others like complete sets. For example, double fingers would consist of a thumb, thumb, index finger, index finger etc.
8. Package your press-on nails.
Package your press-on nails neatly and professionally in a box or bag. This will make them more appealing to customers and help to protect them during shipping. A simple packaging strategy would be to use a nail binder. A nail binder is essentially a ring binder, spiral binder, or book with plastic sheet sheets on which your nails can be arranged. You can secure them with double-sided tape for easy storage.
You may also want to include a nail file, nail buffer, and cuticle pusher in the package. You can use small boxes, jewelry pouches, or other packaging that is suitable for shipping.
How to make press-on nails look really Natural
There are many ways that you can make your personal nails look natural. This is mainly for creating custom sets for clients or customers. You can start by ensuring that you have the correct sizes for your customers. When you include your instructions be sure to explain the proper way to apply your press on nails. You can also opt for using nude or neutral-colored nail polish for a more natural look.
When creating your press on nails for sell offer alternative sizes for your nail sets. Create a small, medium, large or extra-large option. Include the exact nail sizes in your descriptions when placing them for sale. Some business owners include additional nails within the package instead of offering just a full set of 10 nails. This is typically what they call a “set of 24 nails” in which it includes 2 or more nails in varying sizes. This is so that if one size doesn’t fit properly you have one that does.
While this option may be an easy solution to solve a problem when making press on nails to sell, it can also be very time-consuming and expensive. If the nails have intricate designs, you will have to create them for the “additional” nails. This can be costly for entrepreneurs press on business plan especially if the customer has no use for them. The same applies to additional solid-colored nails since you need to add nails and use art supplies to complete them.
additional tips for making designer press-on nails:
- Have a few nail stand sets on hand to use for your press on nails business.
- Pre -roll your adhesive putty and place them in a small container. Use high-quality gel polish and nail art supplies.
- Be creative and experiment with different designs when making press on nails.
- Don’t be afraid to try new trends.
- Pay attention to the design details and take your time.
- Practice makes perfect!