Health Is Wealth, And Sometimes Plastic:
“The history of acrylic nails and enhancements became a status symbol in certain societies, indicating that, unlike commoners, they did not have to do manual labor. The longer and more ornate the nails, the greater the wealth.”

The First Known Manicurist:
Mary E. Cobb was the first known American manicurist and introduced modern nail manicuring to Britain and the United States. She was a trailblazing figure in the field of nail care and beauty. Mary E. Cobb opened her first Manhattan manicure salon in 1878 as “Mrs. Pray’s Manicure”. The Salon was an extension of her husband’s manufacturing business.
Mary Cobb’s journey in the world of beauty began in 1878, when she opened her first manicure salon in the bustling heart of Manhattan. Known as “Mrs. Pray’s Manicure,” the salon quickly gained a reputation for offering exceptional nail care services that were ahead of their time. This salon, which became a popular destination for women seeking exquisite nail treatments, was an extension of her husband’s thriving manufacturing business.
With her steady hands and artistic flair, Mary Cobb revolutionized the manicure experience. She introduced innovative techniques and tools that elevated nail care to new heights. From shaping and filing nails to applying quality polishes, she meticulously transformed women’s hands into elegant works of art. Her attention to detail and commitment to excellence quickly set a new standard in the world of nail care.

The success of Mary Cobb’s salon soon transcended regional boundaries, catching the attention of beauty enthusiasts across the Atlantic. Her expertise and pioneering work inspired many, leading to the widespread adoption of modern manicuring techniques within the British and American beauty industries.
Today, her influence can still be seen and felt in the countless salons and spas where skilled manicurists continue to create stunning nail designs.
Mary E. Cobb’s legacy as a visionary and pioneer in the field of manicuring lives on, reminding us of the power of innovation and the impact of individuals who dare to challenge the status quo. Her contributions to the beauty industry have left an indelible mark, shaping the way we care for and adorn our nails to this day.
Over time, Mary developed a savvy business manner and focused on a higher-end market, which evolved into operations at two townhouses on West 23rd Street in New York. This also included branches in Chicago, Washington, Boston, and Philadelphia. In addition to manicures, Mary’s salons offered hairdressing and skin care.
She and her ex-husband made their most lasting contribution to the nail care industry with the invention of the emery board. At the turn of the 20th century, Mary E. Cobb and Parker Pray (Her ex-husband) held a monopoly on the production and sale of the emery board, along with many other nail care items such as red and pink nail polish.
What Are Artificial Nails?
“Artificial nails, also known as fake nails, false nails, acrylic nails, nail extensions, or nail enhancements, are extensions placed over the natural nail to be worn as fashion accessories.”
Artificial nails are to be worn as an extension, and not as a replacement for your natural nails. Acrylics, by their chemical nature, are durable and strong. The acrylic nails are made out of acrylic glass. When it is mixed with a liquid monomer, it forms a malleable bead. This mixture begins to cure immediately, continuing until it is completely solid within minutes.
The History Of Acrylic Nails
Acrylic nails have a fascinating history that dates back several decades. The concept of artificial nails can be traced back to ancient civilizations like China, where nail enhancement materials such as gum arabic, beeswax, and egg whites were used to create a form of artificial nails. However, it was not until the 1950s that the modern acrylic nail, as we know it today, began to gain popularity.
In the early 1950s, a dentist named Fred Slack accidentally broke his natural nail. In an attempt to create a replacement, he used dental acrylics and aluminum foil to fashion an artificial nail. This innovation led to the birth of the first acrylic nail system, known as the “Slack System.” Shortly after, professional nail technicians started experimenting with acrylates and other materials to create artificial nails.
By the 1970s, the popularity of acrylic nails started to soar, primarily due to advancements in the nail industry and the increasing demand for nail enhancements. Nail salons began offering acrylic nail services, and more and more individuals embraced the trend. With its durability and versatility, acrylic nails became a favorite choice for those seeking long, beautiful nails.
Over the years, nail technology continued to evolve, leading to significant improvements in the quality and application process of acrylic nails. Nowadays, acrylic nails are made using a combination of liquid monomer and powdered polymer, which, when mixed, create a malleable substance that can be molded onto the natural nail or nail extension. The mixture then hardens when exposed to air, resulting in strong and long-lasting artificial nails.
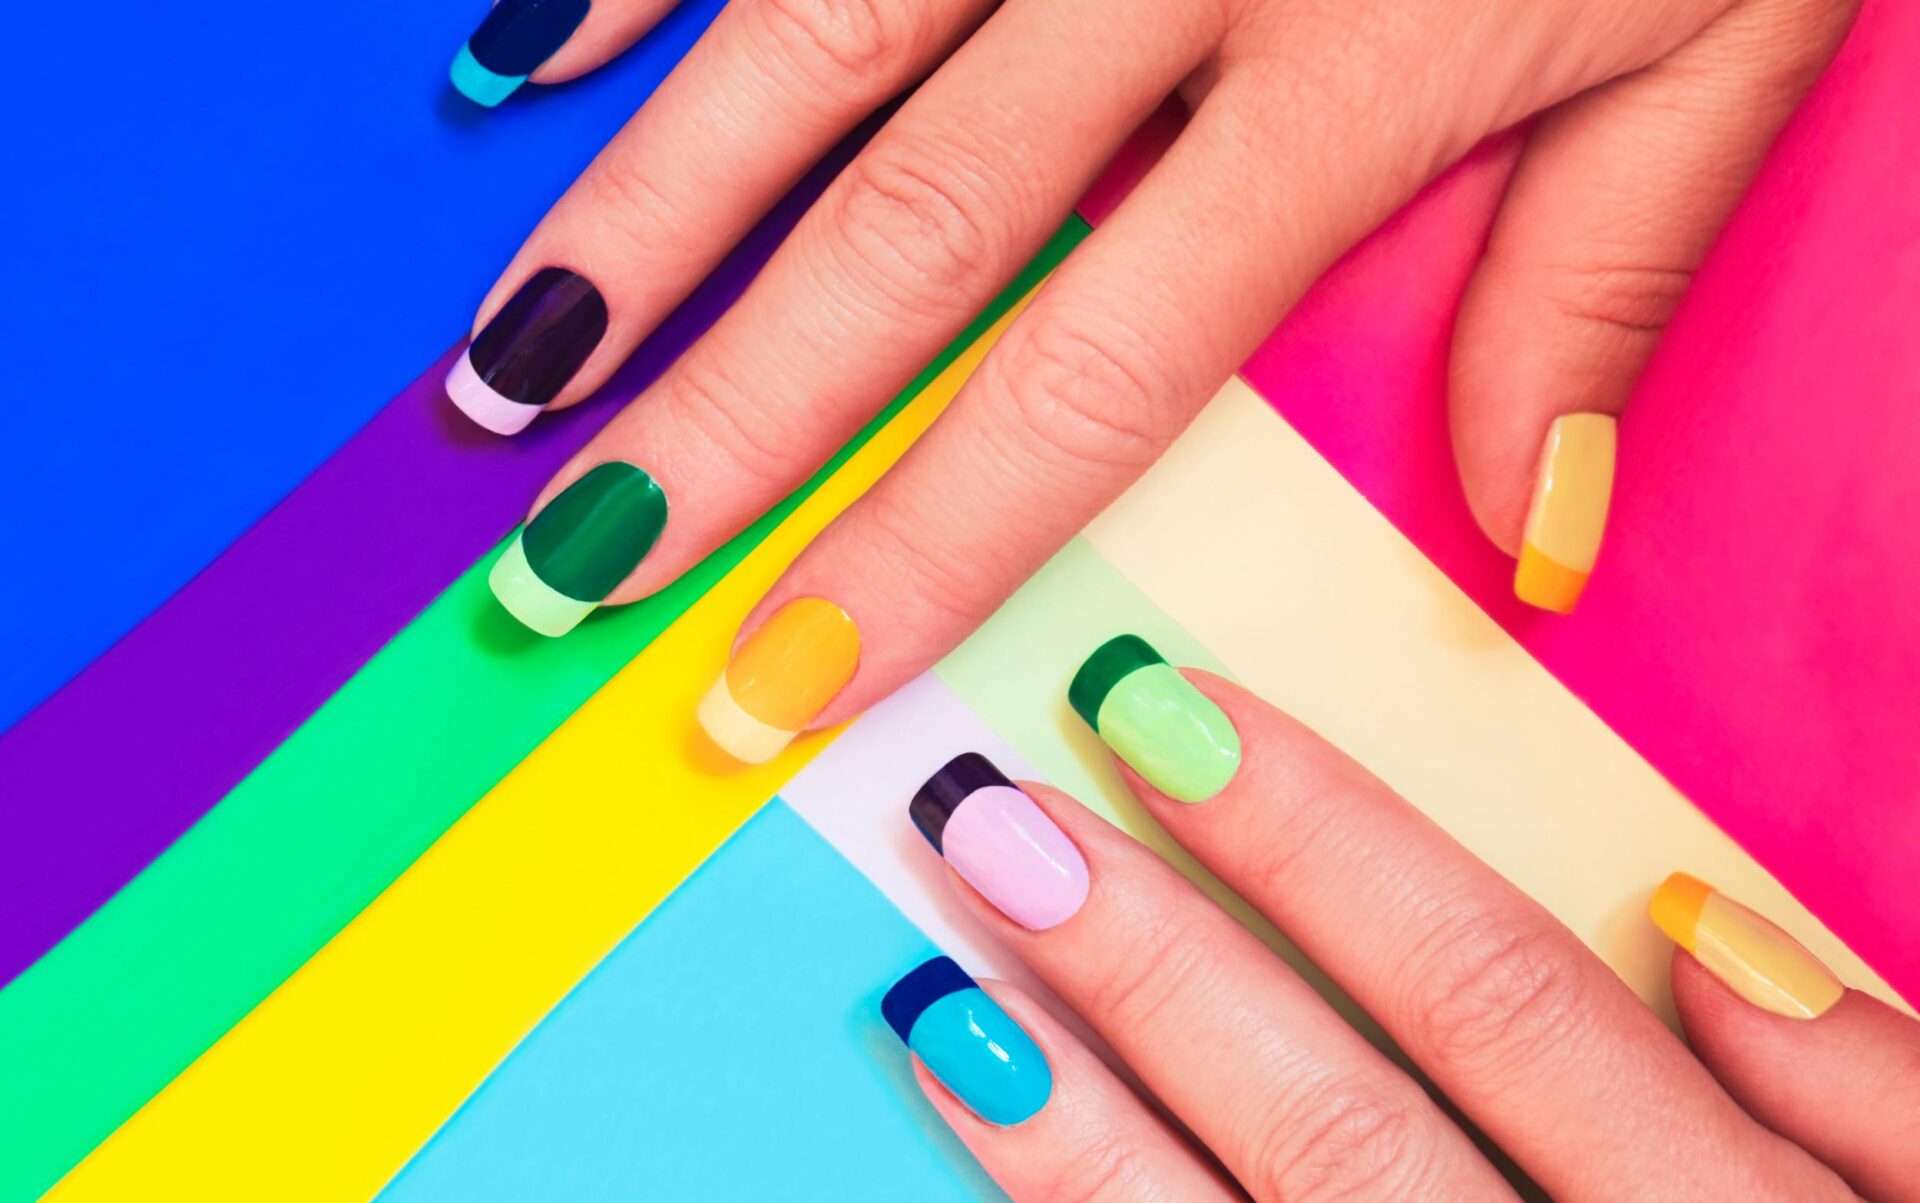
Acrylic nails have become a staple in the beauty industry, providing individuals with the opportunity to express their creativity through various designs, shapes, and colors. Whether it’s for a special occasion or everyday wear, acrylic nails offer a glamorous and polished look that many people adore.
In conclusion, the history of acrylic nails is a story of innovation and creativity. From humble beginnings to a booming industry, acrylic nails have come a long way and continue to be a popular choice for nail enthusiasts around the world.
The Types of Acrylic Nails:
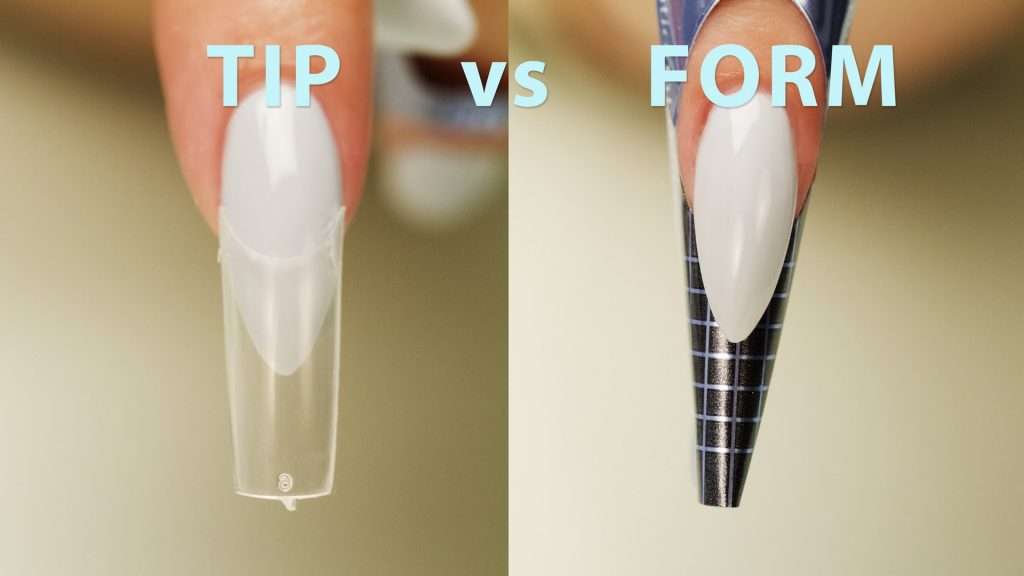
There are two main approaches to creating artificial nails—Tips and Forms:
Nail Tips:
Nail Tips are lightweight “nail”-shaped plastic plates glued on the end of the natural nail. After the nail tip is sized and glued to the tip of the nail bed, the acrylic monomer mixture is applied over the entire nail. They can come in many different shapes, sizes, and colors. The most popular ones are usually clear or white.
Nail Forms:
Nail Forms are shaped sheets with a sticky edge that is effectively wrapped around the entirety of the nail. The form acts as the base for layering the acrylic to create the nail. Instead of an artificial nail, forms can be used to create a set of salon-worthy acrylic nails at home.
How To Apply Acrylic Nail Tips:
Acrylic nails are a popular type of artificial nail that can be used to create a variety of looks, from natural to glamorous. Acrylic nails are made from a mixture of liquid and powder that is applied to the natural nail and then cured under a UV lamp.
| Acrylic liquid | Cuticle Nippers | Nail Primer |
| Acrylic Powder | Cuticle Pusher | Nail Bonder |
| Acrylic Nail Brush | Cuticle Stick | Nail Tips (Optional) |
| Paper Towels | Nail Buffer | Nail Glue |
| Nail Polish Remover | Nail File | Dappen Dish |
| Cotton Balls | Nail Forms (Optional) | UV Lamp |
Gather your materials. Create a list of all the items you will need to create an acrylic nail set. If you have to go shopping for supplies that should be completed before you begin. If you don’t want to shop around for the items, purchase a premade nail kit from a department store or beauty supply store.
Prepare your nails. Remove any old nail polish and clean your nails with nail polish remover. Push back your cuticles with a cuticle pusher and trim any excess cuticles with cuticle nippers.
Apply nail primer and bonder. Apply a thin coat of nail primer to your nails and let them dry completely. The primer will be used to protect your nails. This step is optional but many people buff the natural nail so the glue will stick better. Once completed, apply a thin coat of nail bonder or adhesive glue to your nails.
Apply nail tips (optional). If you are using nail tips, apply them to your nails using nail adhesive glue. Make sure that the nail tips fit snugly against your natural nails. Start by selecting your correct nail sizes. The nail tips should be wide enough to cover your entire natural nail. They also should not overlap the edges of your nails. Find the best fit and then lay them out in the order you need them. Be sure not to apply a nail tip that is too small.
- Apply a line of adhesive gel to the indented area of the tip.
- Make sure you have the right nail before pressing it onto your finger.
- Press the nail tip against your natural nail to ensure the adhesive bonds.
- Press firmly on the nail for about 5–10 seconds.
Apply the acrylic mixture. Mix together a small amount of acrylic liquid and powder until you form a thick paste. This will typically be in the form of a small, medium, or round ball-like shape. Apply the acrylic mixture to your nails, starting at the base of the nail and working your way up. Be sure to cover the entire nail, including the tip. When performing this step, be sure to work fast. You don’t want the mixture to dry too fast before you can apply it to the nail.
Cure the acrylic mixture. Place your nails under the UV/LED lamp for 2-3 minutes to cure the acrylic mixture.
Shape and buff your nails. Once the acrylic mixture is cured, use nail clippers or a pair of nail scissors to trim the nail down to your desired length. Use a nail file to shape your nails to the desired length and shape. Filing your nails will also shorten them slightly. A nail buffer should be used to smooth out the surface of your nails.
- Use a file to shape your nails into your desired shape.
- There are many shapes to choose from such as square, almond, coffin, and stiletto.
Apply nail polish (optional). If you want to apply nail polish to your acrylic nails, this will be the final few steps. Wash your hands thoroughly with soap and water before applying the nail polish. Apply a base coat to your nails before you begin painting. After the base coat apply your solid-colored polish, any nail decals, or decorations, and let it dry. If you are using gel polish, cure the polish before applying the top coat as the final step. Be sure to use a top coat to seal in the polish and protect it from chipping.
Tips for applying acrylic nails:
- Use a small amount of acrylic mixture at a time. It is better to add more acrylic mixture as needed than to have too much acrylic mixture on your nails.
- Be sure to apply the acrylic mixture evenly to your nails. Avoid getting any acrylic mixture on your skin.
- If you get any acrylic mixture on your skin, wipe it away immediately with a cotton ball soaked in nail polish remover.
- Be careful not to overfile your nails when shaping them. Overfilling can weaken your nails and make them more prone to breakage.
- Let the acrylic dry completely before filing and shaping the nails.
- If you are new to applying acrylic nails, it is a good idea to practice on a few artificial nails before attempting to apply them to your natural nails.
Instructions For Acrylic Nails Using Nail Forms:
- Prepare your nails by washing them thoroughly with soap and water. Remove any old nail polish or gel.
- Push back your cuticles with a cuticle pusher.
- File your nails to the desired length and shape.
- Apply a thin layer of nail primer to each nail.
- Apply a thin layer of nail bonder to each nail.
- Place a nail form under each nail.
- Mix together a small amount of acrylic liquid monomer and acrylic powder in a dappen dish.
- Use the acrylic brush to apply a bead of the acrylic mixture to the nail form.
- Gently spread the acrylic mixture over the nail form, starting at the cuticle area and working your way down.
- Cure the acrylic nail under the UV lamp for 2-3 minutes.
- Repeat steps 7-10 for each nail.
- Once all of the nails have been cured, remove the nail forms.
- File and buff the acrylic nails to the desired shape and smoothness.
- Apply a top coat to each nail.
Tips:
- For a stronger bond, you can apply a thin layer of base coat before applying the primer.
- If you make a mistake, you can wipe away the wet acrylic with a damp cloth.
- Be careful not to over-file the acrylic nails, as this can weaken them.
- Apply a top coat every few days to keep the acrylic nails looking their best.
Gel Nails Versus Acrylic Nails
With a little practice, you can apply acrylic nails at home that look and feel just as good as salon-applied nails. Whether gel nails are better than acrylic nails is a matter of personal preference. Both types of nails have their own advantages and disadvantages.
Gel nails:
- Pros: Gel nails are more flexible than acrylic nails, which makes them less likely to crack or break. They are also easier to remove and less damaging to the natural nails. Gel nails also have a glossier finish than acrylic nails.
- Cons: Gel nails can be more expensive than acrylic nails. They also take longer to apply and remove. Gel nails can also be more difficult to repair if they do crack or break.
Acrylic nails:
- Pros: Acrylic nails are more durable than gel nails and can last for several weeks with proper care. They are also less likely to chip or peel. Acrylic nails are also more affordable than gel nails and easier to repair if they do crack or break.
- Cons: Acrylic nails are more rigid than gel nails, which can make them less comfortable to wear. They can also be more damaging to the natural nails when they are removed. Acrylic nails also have a less glossy finish than gel nails.
Ultimately, the best way to decide which type of nail is right for you is to try both and see which one you prefer. You may also want to consider your lifestyle and budget when making your decision. Here are some additional things to consider when choosing between gel nails and acrylic nails:
- Durability: Acrylic nails are more durable than gel nails and can last for several weeks with proper care. Gel nails typically last for 2-3 weeks.
- Flexibility: Gel nails are more flexible than acrylic nails, which makes them less likely to crack or break. Acrylic nails are more rigid and can feel less comfortable to wear.
- Price: Gel nails are typically more expensive than acrylic nails.
- Application time: Gel nails take longer to apply and remove than acrylic nails.
- Removal process: Acrylic nails are more damaging to the natural nails when they are removed. Gel nails are easier to remove and less damaging to the natural nails.
- Appearance: Gel nails have a glossier finish than acrylic nails. Acrylic nails have a more matte finish.
If you are looking for a durable and long-lasting nail, acrylic nails are a good option. If you are looking for a more flexible and comfortable nail, gel nails are a good option. If you are on a budget, acrylic nails are a more affordable option.
However, it is not 100% responsible for your rankings, as many other factors play a role in ranking a site and building backlinks is just one of the factors.
Thank you for the suggestions. I will try my best to incorporate many different marketing strategies into improving my social rankings. Content first. Rankings second. There is always room for improvement. I wish you the best of luck and much success!