Blooming Gel Nail Designs
Blooming gel nail designs are a beautiful and unique way to add a touch of glamour to your manicure. Blooming gel is a special type of nail polish that creates a watercolor-like effect when applied to the nail. It is available in a wide range of colors, so you can create a variety of different designs.
To create a blooming gel nail design, you will need a base coat, blooming gel nail polish, and regular nail polish or gel nail polish. Gel nail polish is highly recommended for use to create these designs. You can also use other nail art supplies, such as dotting tools and stamping plates, to create more complex designs.

Here is a simple step-by-step guide on how to create a blooming gel nail design:
- Apply a base coat to your nails and let it dry completely.
- Apply a thin layer of blooming gel to your nails.
- Use a dotting tool to apply drops of regular nail polish to the blooming gel.
- Use a dotting tool or a toothpick to swirl the nail polish around on the blooming gel.
- Allow the blooming gel to dry completely.
- Apply a top coat to your nails and let it dry completely.
Blooming gel nail designs are a fun and easy way to express your creativity and add a touch of glamour to your nails. Blooming gel is a special type of nail polish that creates a watercolor effect when it is applied to wet polish. This effect can be used to create a variety of different designs, from simple gradients to complex floral patterns.
To create a blooming gel nail design, simply apply a layer of blooming gel to your nails and then add drops of other polish colors. The blooming gel will cause the colors to spread and blend together, creating a unique and beautiful effect. You can use a variety of different colors and techniques to create different looks.
blooming gel nail design ideas

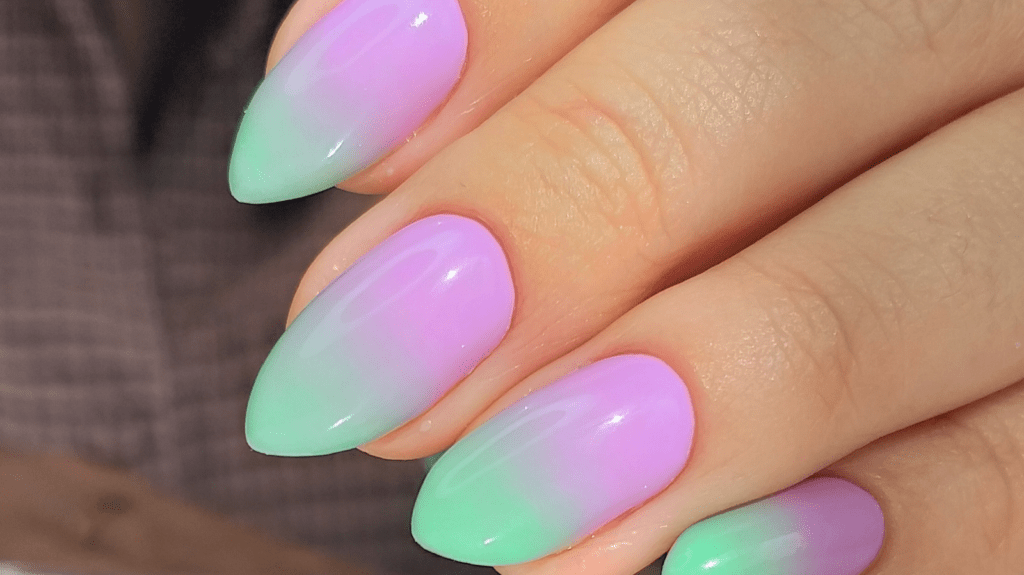
- Ombre Blooming Gel Nails: Apply two different colors of blooming gel to your nails and swirl them together to create an ombre effect.
- Simple gradient: Apply a layer of blooming gel to your nails and then add a few drops of a darker polish color to the tips of your nails. The blooming gel will cause the two colors to blend together, creating a simple and elegant gradient effect.

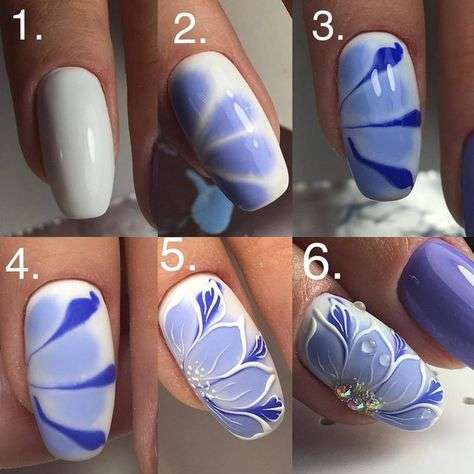
- Flower Blooming Gel Nails: Apply dots of blooming gel to your nails and use a dotting tool to create flower designs.
- Floral pattern: Apply a layer of blooming gel to your nails and then add dots of different polish colors to create a floral pattern. You can use a dotting tool to create different shapes and sizes of dots.
- Galaxy blooming gel nails: Apply different colors of blooming gel to your nails and swirl them together to create a galaxy effect.
- Abstract design: Apply a layer of blooming gel to your nails and then add drops of different polish colors in a random pattern. The blooming gel will cause the colors to spread and blend together, creating a unique and abstract design.
- Marble blooming gel nails: Apply different colors of blooming gel to your nails and swirl them together to create a marble effect.
Tips For Creating Blooming Gel Nail Art :
- Use a thin layer of blooming gel. If you apply too much of the blooming gel, it will be difficult to control the design. You only need to apply a thin layer to the area of the nail where you want the blooming effect to take place.
- Use a variety of colors to create more interesting designs.You can use complementary colors to create a vibrant and eye-catching effect, or you can use analogous colors to create a more subtle and sophisticated look. You can use regular nail polish to create your blooming gel nail designs, but gel nail polish is preferred. Gel nail polish allows you to have more control of the paint since it can be moved along the nail freely. Using regular nail polish will cause the polish to dry more quickly over the blooming gel polish. If you want to use regular nail polish, create your designs in small sections and be sure to move at a faster pace.
- Experiment with different techniques. You can apply the blooming gel directly to your nails or to a pallet and then transfer it to your nails. You can also use a dotting tool to create different patterns.
- Use a dotting tool or a toothpick to swirl the nail polish around on the blooming gel. This will help to create a watercolor-like effect.
- Allow the blooming gel to dry completely and CURE THOROUGHLY before you begin applying a top coat. This will help to prevent the blooming gel design from smudging, smearing, or being altered in any way.
- Be patient. It takes a little time for the blooming gel to dry and for the colors to develop. Don’t rush the process, or you may end up with a smudged design.
Once your blooming gel nail design is dry, you can finish it off with a top coat to protect it and make it last longer.
Blooming gel nail designs are a great way to add a touch of glamour and creativity to your nails. They are also easy to create, even if you are not a professional nail artist, blooming gel nail art is very beginner-friendly. Experiment with different colors and techniques to create your own unique and beautiful blooming gel nail designs.
